Showing posts with label Painting. Show all posts

Friday, 26 September 2025

DRP 3mm 1940 forces for Eisenhower - completed

Four complete divisions in
a shallow A4 Tuff box.
I completed my 3mm armies for Eisenhower. Painting is now getting quite difficult for an old chap like me, so this is probably my first and last 3mm project. I had two main precepts: to make the vehicles and figures 'pop' and to avoid oversize base texturing.

Whereas the aim in real life would be to camouflage men and vehicles and to blend into the background, that would be totally counter-productive for such tiny models. The colour scheme needed to be lighter, contrasting and simpler than in real life. I also wanted to avoid using sand or static grass in a way that would be out of scale with the models.

The bases were intended to be dioramic, so my first step was to arrange and stick the models down. Here I made a mistake. I should have put slivers of card under the vehicles so they were of a height with the infantry and I could then have applied filler between the models to hide the base edges and level everything up. By putting filler only around the infantry, I ended up with a lumpy effect.

I attempted to disguise this problem by adding irregular areas of sand to represent scrub. This was a partial success, but the end result looks more like bramble patches on Wimbledon Common than Belgian fields.

With the models, filler and sand added, I gave everything an overall wet brush of dark brown. I then dry-brushed the vehicles using light versions of the historical base coats with no attempt to add secondary camouflage colours. I block-painted the infantry in 2 or 3 colours, but one would probably have done. This approach was essentially the same as I've used for larger scales that I've based before painting.

On the plus side, I think my decisions to restrict the colours and make the models 'pop', and to avoid out of scale texturing, were correct.

On the minus side, I should have pre-based the vehicles to match the infantry as explained, and then I wouldn't have had to add the scrub. I should also have chosen a less vivid green for the grass and dry-brushed it.

Wednesday, 20 July 2022

10mm Normans rebased

Taking advantage of a rare opportunity to do some painting etc over the last couple of weeks, I have now just finished reorganising and rebasing the 10mm Normans that I inherited. Actually finishing a project is a big achievement for me these days.

This project involved:

  • Soaking the old card bases in water and removing.
  • Planning the new units.
  • Adding a few additional figures for fun (crossbowmen and peasants with improvised weapons).
  • Repainting some mail in silver and some textiles in colour.
  • Sticking the figures on my preferred MDF/steel combination bases.
  • Texturing the bases with Tetrion filler and a sand/ballast mix.
  • Painting the bases.
  • Applying 2mm static grass.

Most readers will be familiar with all these techniques and I've covered them all before. However, I will make a few relevant remarks.

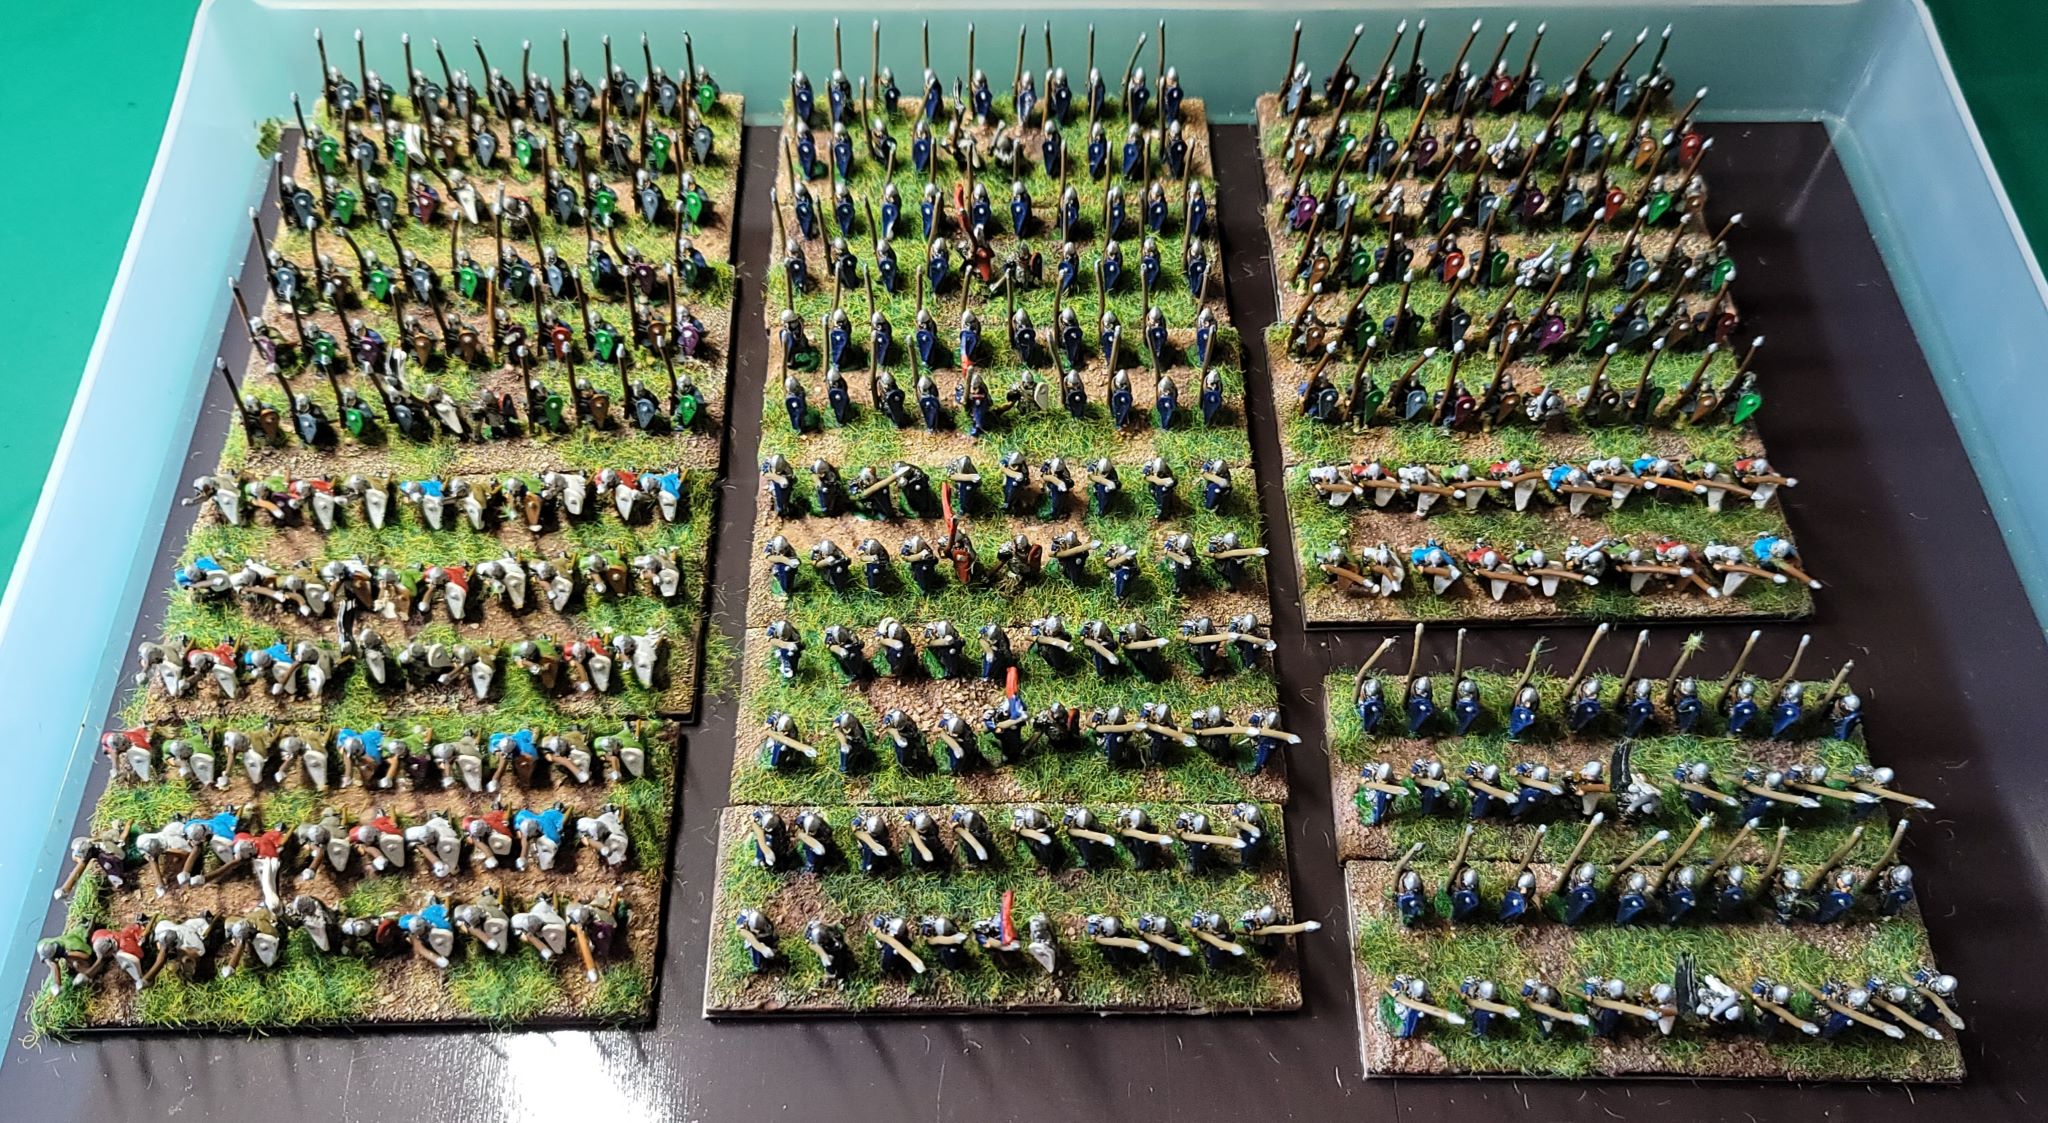
Front left: Sergeants. Back left and centre: ordinary cavalry. Right: veteran cavalry.

I like planning units and spent a lot of time doing it. The aim was to optimise use of the figures I had in order to produce two armies. In the end I went with 80mm wide bases to be used on a 100mm grid. This is for To the Strongest! Each base is a unit.

Repainting was fairly impressionistic. I hit the main areas. These are 10mm figures after all. Nobody should notice or care unless they lead very sad lives.

On the new figures, I painted faces but no hands. I might repaint some of the shields to provide more variation and I might add a dark wash to tone down the colours I used on some of the new figures, but I may never get round to it.

Left to right, front to back: Fyrd; Foot Sergeants; Flemish Spearmen, Norman Militia.

The sand was applied to the Tetrion while it was still wet. The best results are achieved by having the Tetrion very wet. But getting the filler between multibased ready-painted figures was awkward.

The bases were initially flood painted with a very dilute wash of household emulsion. The sand soaks it up. They were then dry-brushed with Zamesi Desert and Ushabti Bone.

The static grass was applied with an electric applicator. I'm not entirely convinced this made much difference but it didn't do any harm.

Left: Feudal levies. Front: Crossbows. Back: Bows.

I learnt two lessons from this project:

  1. Basing the figures before painting as I did for my 10mm ACW and 6mm TYW armies is a much better approach for multibased figures. In this instance most of the figures were already painted so I wasn't working from scratch. I'm not sure, however, whether I would pre-base 15m or 28mm figures, but I would certainly think about it.
  2. Dry-brushing the bases in just two colours was adequate.

The overall approach was based on expending the minimum effort and time, and to rely on the new bases for aesthetic effect. In that it was a resounding success.

Thursday, 17 December 2020

2020 - the year that was cancelled

Bought yesterday - the bristles are for
6mm Thirty Years War pikes.

Although I'd expected to get a lot of painting done during the Plague Year, things didn't turn out that way because of other distractions and circumstances. In the first half of the year I did make considerable progress with painting my 6mm Thirty Years War armies for Tilly's Very Bad Day and I also made some progress with my all too numerous 28mm Rampant armies which I wanted to bring to a level where I could put any of them on the table even though they would not be 'fully painted'.

This essentially meant basing, adding filler to the bases, undercoating and adding an initial wash in the dominant costume colour. They would not be pretty, but they would be identifiable and distinguishable. I will reiterate yet again that I am committed to further painting before any given army is brought out again. I should also stress that some of my Rampant armies are already painted.

Well, I did get all the relevant armies sorted, cleaned-up and based, and I applied filler to the vast majority of those requiring it. That’s as far as I got but it was some sort of achievement. Before everything went pear-shaped I also managed 4 games - one of Lion Rampant and three of Rebels & Patriots.

I wasn't initially affected by the ennui that other wargame bloggers reported but I'm beginning to feel rather demoralised since they closed the coffee shops, pubs and restaurants even though there was no evidence they were spreading infection. They provided a little relief in a year when social and hobby activity has been closed down. Endless walks are fine in spring, summer and autumn but less attractive in the bleak midwinter.

Wednesday, 29 April 2020

Using a wet palette

Too wet and the colours run. Too dry and the
colours dry out. But it's still a great idea.
While painting my 6mm Thirty Years War armies, I've been experimenting with a Redgrass wet palette.

I've never used a traditional artist's palette of any type to paint miniatures. I've used paints singly straight out of the bottles, or, rather, I've used a cocktail-stick or coffee-stirrer to transfer dollops of each paint onto old jar lids.

Using a 'mixing' palette encourages a dirtier approach, intentionally or just inevitably. This hasn't made much difference to the Thirty Years War armies which are block painted with dabs of bright colour, but I'm wondering if the increased spectrum of tone will add to realism when painting larger figures.

The wet palette can't be used for washes or metallics. Obtaining the right degree of wetness is tricky,  not least because the paints themselves vary in their wetness. I therefore still keep old lids (my dry palettes) and a little dish of water next to the wet palette for dealing with watery or overly dry paints.

With the right wetness paints will last quite a few days and I can quickly return to painting in an odd moment of opportunity which is very handy for fitting in my painting around other commitments. While I haven't yet optimised my use of a wet palette, it’s become central to my current painting.

Saturday, 25 April 2020

Thirty Years War 6mm progress 11: The Foot

The Foot bases are particularly packed and dark so I needed to optimise the use of light/bright colours. These artificially vibrant colours are intended to make the blocks pop - shocking close up but more visible further away.

Swedish Pike-and-Shot and Commanded Shot. These represent ethnic Swedes and German Protestants in Swedish service. Scots in Swedish service are in hodden grey and blue bonnets (front rank, centre). The Swedes have a higher proportion of shot than the Spanish, Catholic-Imperialists and Saxons. This will be more obvious when I replace the pikes.
My painting reference has been Steven Thomas’s series of uniform articles on Balagan, but my painting inspiration has been the 2mm (!) armies on Roundwood's World. Yes, a 2mm approach to painting 6mm figures is quite enough for me.

Spanish Pike-and-Shot. The drummers are picked out in yellow so I can quickly identify the blocks.
Swedish blocks (i.e. ethnic Swedes or Germans in Swedish service) and Saxons are uniformed  but the Catholic-Imperialists and Spanish are not, though the latter are distinguished by particular use of red and yellow.

Catholic-Imperialist Pike-and-Shot and Commanded Shot. Here the drummers are all in red.
Most of the coats don’t really show unless you view the blocks at eye level. Once again it’s the headgear that stands out.

Saxon pike-and-shot - awaiting uniform information. Steven Thomas is painting his own Saxons at the moment and will be publishing uniform guidance in due course.
Flags will be attached to dress pins. Pikes will be brush bristles in a natural brown colour, but I'll have to wait on the Coronavirus emergency before I can go out and shop for brush-heads.

I'll be adding a little more detail to Foot and Horse over the next few days. Then they'll be put back in storage so that next month I can move on to working on my many Rampant armies...

Monday, 20 April 2020

Thirty Years War 6mm progress 10: Croats, Dragoons, Cannons and Commanders

Spaced out in comparison to figures on other bases, the Croats, Dragoons, Cannons and Commanders demand a fuller and more conventional approach to painting. The bases photographed here aren't necessarily finished but the general impression they give isn't going to change much.

Croat Light Cavalry
The Baccus figures used for the Croats aren’t exactly correct but give the right impression and will do. I cut away some of the lances to represent firearms, but if you look closely you can see anachronistic bow-cases. However, I will insist that all viewers maintain social distance. At 2 metres the problem disappears, a small compensation for the end of normal life.

Swedish Dragoons
The Dragoons are my favourite figures and I have created the bases as little dioramas in contrast to the massed ranks of the Horse and Foot. It’s tricky to get the paintbrush in, but there are only a few of these bases to do.

Some generic Guns
The Cannons are what they are. Not much else to be done on these.

Some generic commanders
The Commanders are like other mounted figures of various types - Cavalier, Roundhead or Cuirassier style. In theory I could attempt to complete the Commanders to a higher standard but it would only raise expectations. The trick is to make the whole army look good enough at a glance.

These bases have more room for static grass and maybe some other foliage. This will detract from the meagre painting and greatly add to realism.

Monday, 13 April 2020

Thirty Years War 6mm progress 9: Arquebusiers and Swedish Horse

Arquebusiers (using Baccus mounted Dragoon figures).
The vivid green sleeves pop close up but generally the
addition of sleeves is underwhelming.
Having made good progress in March on my 6mm Thirty Years War armies for Tilly's Very Bad Day I decided to devote April to the same project.

Next up for attention were the mounted Arquebusiers and Swedish Horse. While there is no foreseeable prospect of using them in a normal game, painting is a good therapy in these troubled times.

The Arquebusiers are particularly closely packed which makes access difficult. Another way to look at that, however, is that those awkward areas are naturally in shadow and so don't need to be painted!

The main downside of not painting something is that it's not contributing to the overall lightening of the blocks. Other than that it's part and parcel of the approach I've adopted.

Another problem - and this is nothing to do with crowding - is the the surface available to be painted. Given the areas that are intended to be left brown (straps, accoutrements, small arms) and the shadow between them, there is very little figure left to paint - basically just the sleeves and that is a very small area.

At this stage I'm wondering if block painting, especially when combined with pre-basing, works better with 10mm figures because there is more area to paint. With 6mm it may be better to give the figures an overall 'end' colour.

Commanders, Swedish Horse and Arquebusiers.
Hats off to the addition of hats. Bits of horse, hats
and, of course, the bases are really all that
shows at a distance, and, therefore, all that's
worth painting!
Anyway, back to the job in hand. When painted the sleeves hardly showed. I got completely bored with this lack of impact and decided to move on to the hats. As expected, these really stood out and lifted the blocks immensely.

So, let me once again evaluate the painting approach with regard to these particular figures...

They had a pinpoint dab of flesh for the faces which took hardly any time at all, some tiny dabs of colour for the sleeves which required a bit more care and effort because of access, and a bigger but easy application of colour to the hats which were painted with 2-3 brushstrokes.

All in all a good effect IMO was achieved for an extremely economical effort. I can and will add more detail to lighten the blocks, but it will hardly be seen. Whatever more I do the blocks are not going to end up looking very different from the way they look now.

Monday, 6 April 2020

Thirty Years War 6mm progress 8: Cuirassiers

First major use of a magnifying glass
which I found helpful in this instance.
In accordance with my plan for 'Getting in Sync' I decided to devote each month to painting/playing a particular game (or series of games). With the great lockdown the playing part has dropped out of the picture, but I am otherwise keeping to the single monthly focus.

It’s April now but I’m still reporting March’s progress and March was devoted to my 6mm Thirty Years War armies for Tilly’s Very Bad Day. Steven Thomas of Balagan has finished development of TVBD for now but I've yet to finish the painting, let alone play a game.

After the horses I decided to focus on the Cuirassiers who are wearing three-quarters armour. Armour was blackened in the Thirty Years War and I used gunmetal to represent this because these figures are only 6mm and I want to give the figure blocks as much lift as possible given the overall dark brown base coat. Silver is reserved for swords etc.
Thanks to the texturing and painting of the ground and the deep shadow, I think these figures look very 'realistic' despite having only two colours (horseflesh and Gunmetal) added to each figure.

Saturday, 28 March 2020

Thirty Years War 6mm progress 7: Faces

Faces: Visible from 15" at a low angle.
When it came to adding detail to these 6mm Thirty Years War figures, I had to think long and hard about the painting sequence. After horse flesh the most prominent features are hats and other headgear, but these are easy to access and best left till later. There is, therefore, some tension between wanting to cover the most prominent features and needing to paint the more awkward areas first.

My friend Ian had already established to my satisfaction that it wasn't worth painting hands on 6mm figures. I thought I might take this a stage further and dodge painting faces. As an experiment I painted - well, dabbed - faces on a couple of blocks as as experiment and then placed these at various 'tabletop' distances to see what could actually be seen.

At a distance the faces did show as specs of lightness, but close up they didn't show because with the higher viewing angle the faces were obscured by the broad-brimmed hats. How ironic!

Anyway, I decided I would paint faces where I could. The figures fell into three categories:
  • Cuirassiers, Lobster-pot wearers, Horse trumpeters and Foot 'shooters' either didn't have faces or enough exposed face to be painted.
  • The front-rank pike-and-shot block figures got faces but the rear ranks were inaccessible. That reflected the limitation of basing before painting and cramming the figures together. Many will consider this unacceptable, but I expect the hats and other headgear will detract from the omission and that it will not be detectable at normal playing distance.
  • Other Horse, Dragoons and Artillerymen did get faces.

Saturday, 21 March 2020

Thirty Years War 6mm progress 6: The horses

Not Thiry Years War and not 6mm, but indicative
of what actually shows up in smaller scales.
Since last Monday 'social distancing' has restricted outdoor activity to walks with the dog and provided an unprecedented opportunity for painting. Last month was 1798, this month it's the Thirty Years War.

I've now started to paint the actual figures, but rather than show you that straight away I'd like you to look at the picture (right) of my 10mm American Civil War figures.

This photo was taken during a game and shows what figure detail is actually visible. In fact, the photo is a bit of a close-up so please sit back.

What you can see is little more than the ground around the figures and  their hats. Some other bits do show up but only if they are very light and contrast with the dark brown. For my 6mm TYW figure blocks I am taking this lesson further by committing myself to painting only the bits that will show up.

The main purpose of adding any further paint is not to indulge the individual figures as would be the case with larger scales and other approaches, but just to contrast with and lighten each figure block as a whole.

The other thing to point out is that there is no preconceived end point. I will add paint/detail only until the blocks 'look painted' from a distance. I must also keep in mind that 6mm figures require much lighter and brighter colours in any event, and this is particularly so with the dark brown background approach.

Now let's look at some 6mm TYW figures. I'm prioritising the horses because after the ground the horses represent the largest and most significant area of paint.

Swedish Horse: the chestnuts are painted with Coat d'Arms Chestnut Horse Tone brightened with Burnt Orange. The brush shown is a Number 1 size but it's too small and requires too many dabs. I subsequently switched to a Number 3.

Without making it too obvious, I thought I'd also use horse colours to further distinguish the three types of horse, i.e. Cuirassiers, (Swedish) Horsemen and Arquebusiers. The photo above shows the Swedish Horse with some Chestnuts added. This was inspired by the Swedish folk art Dala horse toys.

The Cuirassiers will have a lot of dark armour so I decided to paint them in light colours (Greys, Light Bays) for contrast. The Arquebusiers would be fairly colourful so they were to retain the basic Charred Brown coat representing Dark Bays.This plan was somewhat modified.

I had originally intended to leave most horses in the dark brown base coat but as painting proceeded I realised that the blocks looked better if all the horses were overpainted with lighter colours.

The Coat d'Arms horse tone colours are all a bit on the dark side and need lightening for this particular project. Simply adding white is not necessarily the answer. I should research this question properly but the quickest solution is to imagine what a lighter version would look like and then pick a ready-made colour that matches that perception.

All horse colours completed and the sun is shining.

All the horseflesh is now picked out but the blocks still look too dark. I am thus relying on coats, armour and headgear to add further brightness.

On the plus side I should point out that at this scale and using this overall technique, each individual horse needed only one colour. Apart from the flank figures, the front rank required only head, front legs and the top of the back to be painted. The rear rank required paint only on the head and hind-quarters.

This was very economical in terms of time and effort, though I do confess that at my age it's quite difficult to see the detail on such small figures and this has made me wonder whether I should do another 6mm army. I do have a magnifying glass...perhaps I should try to use it.

Tuesday, 25 February 2020

Washes and Shades 1

Some textured card used to test washes.
It's been a while since I last completed an army of 28mm figures using a wash technique so it was time to think it through again. I don't have any coloured inks or dedicated colour washes. I do have a lot of different acrylic paints so that is what I’m using.

I've previously washed figures using a simple mix of acrylic paint and water. This time I wanted to get more contrast, so decided to mix the solutions more carefully and to experiment with adding detergent (dish soap) to reduce water resistance and improve flow. Isopropyl has also been mentioned as an ingredient but as it's used to strip acrylic paint I think I'll give that a miss. Another trick I wanted to try was to wet each figure with water before applying the wash.

The figures I'm working on are my 28mm 1798 Irish Rebellion companies for Rebels and Patriots. I want the Government forces to look uniform but I want the Rebels to look '40 shades of grey-brown' so they are an ideal subject for experimentation without running the risk of ruining anything. I therefore started on the Rebels.

Most historical peasant clothing was dyed grey but faded to brown. Various browns, grey-browns and greys will therefore feature as my principal wash colours.

It's a long way down the line but I will also be altering my finishing process. The provisional plan is:
  1. Spray gloss varnish.
  2. Wash with an ink stain or shade.
  3. [Highlight if necessary but hopefully not.]
  4. Add PVA builders’ sand, talus, static grass and tufts.
  5. Spray with Dullcote.
  6. Add flags.
The gloss varnish will again help the final shade to run off the raised surfaces and congregate in the crevices.

The figures had all been primed with white gesso. The washes are intended to be a one pass application of the main clothing colour, though other washes and block painting will be added for variation.

The washes were mixed in varying proportions depending on individual paints but they were basically about 1 part paint to 5 or 6 parts water and one drop of washing-up liquid.

This is what I noticed as I went along but I will be saying more in conclusion.
  1. Basically the constituency needs to be more like a watercolour than an acrylic.
  2. The detergent did break down water resistance and help the wash to spread but it took time to convince me. Use too much, however, and the wash bubbles and the paint gathers in arbitrary patches rather than running into the crevices.
  3. I tried wetting figures first as some recommend, but the effect was too extreme. It diluted the paint too much and created an overall very bland finish.
  4. Washes need to be put on pretty liberally. If you try to be sparing you end up covering the figure too evenly.


Group 1 - Coat d'arms 208 Wood Brown


Group 2 - Vallejo 160 Neutral Grey

The grey looked too neutral, so I added the remnants from the first wash.


Group 3 - Cda 501 British Khaki


Group 4 - Cda 537 Faded Khaki


Group 5 - Cda 519 Mid Stone


Group 6 - Vallejo 983 Flat Earth

Darker colours such as this provide better contrast and make the wash approach more effective. 


Group 7 - Cda 208 Grass Green

This was the first group of figures wearing uniform coats. At this stage they looked like exotic frogs…


Group 8 - Cda 110 Royal Blue


Group 9 - Cda 110 Royal Blue + Vallejo 154 Sky Grey

The gun needed finishing in a 'leaden blue' so I added some grey to the remnant of the Royal Blue.


Group 10 - Cda 238 British Scarlet replaced by CdA 146 Ruby Red

This was the most important group, the most challenging and the least satisfactory. Cda 238 British Scarlet covers poorly when block painting and made a very uneven wash so after a few figures I decided to wash it off and start again. My paint collection is quite old. I've been told that it may not be the age of the paint so much the age of the paint forumula. I then switched to Cda 146 Ruby Red but the figures still came up a sickly pink.

I was happy with the brown, grey-brown and grey washes for civilian clothes but I wasn’t confident that the final stain would make the uniform coats look right. The green was too vibrant, the blue was too grey and the red was shockingly pink.

I tried another wash of a slightly darker red on the redcoats. This reddened the pink a little but it also flattened the shade effect. Even Mrs Phalanx made a passing comment about how awful they looked.


Somewhat discouraged I put the redcoats aside and put a dark but very dilute wash of Cda 521 Army Green on the greencoats. This worked well. It toned down the luminous green but still left a lot of contrast. The figure on the left has been rewashed.


I made a similar improvement to the bluecoats using some cheap Navy Blue hobby acrylic. The figure on the left has been rewashed.


Encouraged by these successes I made a thin wash of Cda 509 Brick Red. Here the figure on the right is the one that has been rewashed. This toned down the pink and restored a shading effect, but they still don’t look quite right. Once the facings and cross straps have been painted in a lot less red will be showing. After the final staining I may have to touch up the red with a more appropriate colour. Time will tell.

These secondary washes on the figures in uniform coats pre-empt the role of the final stain but the figures do look better. Having to do a second wash is contrary to my central principle of economy of effort but it's still quicker and easier than a dark to light approach using two or three tones solidly applied.

Sunday, 16 February 2020

Reflection No 1: Getting in Sync

I may yet have some 'rants' to deliver, but the idea of a rant is too  aggressive for many of my thoughts, so I'm pitching this as a 'reflection'.

Like most wargamers, I'm a serial obsessionalist. I'm happiest when concentrating on one thing and totally submerging myself in it, but then I'm also easily bored and likely to flit to something else! Finding the right balance is a perpetual challenge.

This year I've planned for a limited set of areas and a close integration between what I'm painting and what I'm playing. As I'm basing-before-painting and using-while-painting I'm well placed to do this. (I'm committed to adding more paint before an army is used again so I have to slip the figures on and off painting bases, but that's no great burden.)

I typically play two games a month so the idea is to spend the preceding fortnight working on the armies I intend to use in my next game. Devotion to theme doesn't stop at modelling or swatting up on rules, but may extend to what I read or watch or listen to.This will not only 'feel right' but give me a big incentive actually to do some painting. At the moment I'm focusing on my 1798 figures and the strategy is working.

This approach is much better than the one that involves months of painting before you can play a game with the inevitable loss of interest before an army is finished. I have the semi-painted lead mountain to prove it.

It's a little unusual to write about process rather than models or games, but it's actually fundamental to the whole pursuit.

Friday, 31 January 2020

Thirty Years War 6mm progress 5: drybrushing the bases

I had to patch the basic dark brown coat twice as a result of my mistake in using a white gesso undercoat instead of a black one. I am repeating this as a penance and to sear it into my brain for next time. White undercoats are appropriate for figures that are going to be painted with washes but not for block painting.

The next step was to dry-brush the ground, avoiding the figures as far as possible. The recipe - in fact the whole base-before-painting approach - came originally from Nik Harwood and is executed with successive applications of the following Citadel colours: (1) Mournfang Brown (formerly Calthan Brown), (2) Zamesi Desert (formerly Bubonic Brown), and (3) Ushabti Bone (formerly Bleached Bone).

The Mournfang Brown barely shows but it’s probably important in achieving the overall effect. Owing to the closeness of the figures I'm applying the dry brushing only to the outer rim of these figure blocks.
I assume these names mean something in the Games Workshop universe. I was helped in tracing the name changes by this very useful colour chart.

The Zamesi Desert is a strong mustard colour up close but after applying it the bases then look sort of greenish from a distance.
Using four colours just for the ground may seem excessive but the ground is going to be the most important area after the dark brown shadow between the ranks of figures. Lightening the ground makes a major contribution towards lightening the whole figure block.

Finally, the Ushabti Bone lightens the overall effect. The Croat Light Cavalry, the Dragoons (above), the Cannons and the Commanders are looser and require some paint between the figures.
With this amount of dry brushing to do I'm not being particularly careful. I'll be adding patches of 2mm Static Grass later in the process and this will cover any unsightly 'splodges'.

With this stage done I think the bases are already beginning to suggest how economical and effective this ultra-minimal approach is going to be.

Sunday, 15 September 2019

Thirty Years War: 6mm Paint Plan for Tilly’s Very Bad Day

Some of my 10mm American Civil War figures:
I am basically following the same methodology.
This is a rough and incomplete draft of my plan for painting 6mm Thirty Years War armies for Steven Thomas's Tilly's Very Bad Day. I’ve been creating paint plans privately for years, but I thought it might be interesting to share the experience with readers. It's fairly provisional in its first form but will firm up over time. I will add a little explanatory detail here which I wouldn't necessarily do just for my own benefit.

Once I actually start wielding a paintbrush I'm always very careful to list paints used so I can match them if more models need to be added at a later date. I also mark jobs done so I know where I am and give myself encouragement.

The general approach for this project will be similar to the 'Base before painting' approach that I used on my 10mm ACW armies (see photo above). Last time I found that approach hard-going but it has its advantages:
  • Once the preliminary basing, texturing and undercoating is done, the bases can be used on the table in games.
  • You begin to gain a very good impression of what the figures are going to look like as you go along. You don’t have to wait till the last part of a process (e.g. a ‘magic dip’) before the figures look right.
  • You can balance the colours used on each base.
  • The result is effective.
  • The method is potentially quick, but you need to be relaxed about the parts you can't reach and the lack of detail. You are basically just painting the outsides and the tops.
The main stages are as follows:
  • Base figures.
  • Texture bases.
  • Undercoat with a wet application of Acrylic chocolate brown.
  • 'Pop' figures with light, bright block painting that contrasts sharply with the brown background. If it doesn't stand out it's not worth adding.
  • Leave brown in the shadows between ranks and for anything else that can be left brown e.g. legs, muskets, bags etc.
  • Detail is minimised – overall impression at a distance is maximised, e.g. Faces will be painted but not hands.
The following section is a detailed painting ‘to-do’ list. Some of the detail below is not quite finished. I'm publishing it as it is. I was thinking of posting this a live document but I decided that would be too awkward.  It’s shown here as a list but my working document will be a Word table and some sections will be placed in parallel.

PRELIMINARIES
Make temporary trays for sorting figures into units. DONE
Decide on basing arrangements. TO BE FINALISED
UHU MDF and steel bases together.
Clip and sort into trays by unit. (Note Imperialist infantry have armoured front rank and some musketeers in helmets. Swedes have some musketeers in Monmouth caps.)
Clean castings if/as necessary.

BASING AND UNDERCOATING
PVA all figures (except cannon) to bases.
Tetrion bases.
PVA fine sand to bases.
Supergell cannon in place.
Undercoat with wet application of acrylic dark chocolate paint.

PAINT LARGE AREAS
Paint horses that are *not* brown.
Paint Imperialist cannon carriages…
Paint Swedish cannon carriages…
Do blackened armour on Imperialist Cuirassiers and Imperialist front-rank pikemen (Dark grey? Gunmetal?)

COAT COLOURS
Using light, bright paints, pick out coats:
Buff coats on Swedish Cavalry.
Swedish coloured infantry  uniforms:
Yellow, Blue etc
Paint Scots in hodden grey (brown) and light blue bonnets.
Remainder of Swedish infantry: pearl-grey.
Paint Swedish Commanded Shot – all pearl-grey or split into three colours/sections.
Paint remainder of Swedish cavalry in random colours...
Paint Imperial Pike+Shot, Shot, Harquebusiers, Dragoons, and Croats in random colours...

DETAIL
Dab faces flesh.
Paint Swedish hats....
Paint Imperialist hats...
Paint Swedish Monmouth caps...
Paint Imperialist pike helmets and shot in helmets as blackened.
Paint some Swedish Horsemen with blackened armour.

FINISHING DETAILS
Paint all pikes light wood.

METALLICS
Bronze cannon barrels.
Silver swords, pike points, burnished armour on remaining Swedish Horsemen.

BASE DECORATION
Static grass, ballast, tufts etc.

FINAL
Spray varnish to fix and protect.
[Ink wash and re-highlight???]
[Very light white feather-brush to lift???]
Add flags.

REFERENCES
Balagan's TYW Imperialist Painting Guide
Balagan's TYW Swedish Painting Guide
Balagan's TYW Spanish Painting Guide

Monday, 15 April 2019

Border Reiver Project 4: First wash

The next step was to apply an overall light wash - light in colour and light in thickness. Washes are easy to apply and gentle on brushes. I use a GW Wash Brush. In this case the wash is a light yellow-brown (Coat d'arms 228 Buff ) appropriate to the predominant 'uniform' colour which in this case are the jacks with which most of these figures are kitted.

Coincidentally, brown is also the best colour for leaving in the shadows although most of that will be contributed by the final stain. Brown is also the main colour of clothing, hair, and weapons, though I will probably be using additional, different browns to pick those out. Humble Border clothing was typically a dark 'hodden grey', but that was actually more brown than grey.

Now, I could have mixed brown into the gesso undercoat, replacing two jobs with one. The brown wash, however, brings the figures into relief and gives them more definition and this will make the detail easier to see. That's the theory. I'm not entirely convinced it's very significant. The initial wash is very light in colour because I want to be able to add other washes over the top of it.

As with the white undercoat, I go through the figures again to touch up the wash. I don't want to discover any white patches or specs at a later date. This is a good time to review the forces.

Reivers. Front row: Reiver Household (two units as Forlorn Hope). Dog handler with bloodhounds (personality figure). Mounted Reivers. Back row: Reiver Retainers (two units as Clansmen). March Warden (who should really be with the forces of law and order in the next photo).
Garrison and Militia. Front row: two units of Bows (as Shot). Second row: light gun and two units of Shot.  Back row: three units of pike.
Animals, Civilians and 'Tudor Rebellion' figures. Front row: sheep and shepherd, cattle and cowherd, assorted and pitiable Border civilians. Second row: Gentlemen Adventurers (including a Lady Adventurer), Rabble.

Some of the figures weren't quite dressed for the Borders so the project has grown into the area of 'Tudor Rebellion' - Protestant against Queen Mary or Catholic (or unprincipled opportunist) against Good Queen Bess. When playing Tudor Rebellion rather than Border conflicts, the Garrison troops will be split between a Royalist force and defecting militia throwing in their lot with the Rebels.

Thursday, 28 March 2019

Border Reiver Project 3: Undercoating

Gesso undercoating: straightforward enough.
My basic painting approach for 28mm figures is to undercoat, wash, block paint, and stain. Finally I make the bases and flags look as good as possible so people don't look too closely at the figures.

The washes and final staining create light and shade and substitute for not using a 3-tone paint effect. The only problem with this approach is that you can’t see how it’s eventually going to look until you apply the final stain.

For this job I'm undercoating with undiluted white gesso. White spray paint would be quicker but it's not the right time of year and I have had a very bad experience with spray paint.

I prefer using a white undercoat. I've used black in the distant past but it's hard to see the detail, more so as you get older.

Although neat gesso looks quite thick while being applied, it seems to shrink tighter as it dries. I don’t want to discover any bare bits of metal later on so the next step is to touch up the gesso, a job best done in good light.
Some pike block figures drying off. Those North Star pikes are lethal.
I'll have to warn people about them when they're put on the table.

Tuesday, 15 January 2019

Border Reiver Project 1: Preparation of castings

Tools for preparing castings: 
Large flat file, scalpels, small files, Games Workshop
snippers, superglue and pin vices (drills).
I decided to report on this project as I go along, partly to put pressure on myself to keep going, and otherwise because my approach might be of interest to others or I might need some feedback on options...

The figures are 28mm Timeline and Foundry metals and there is a total of 13 mounted, 150 foot, 1 gun, 3 cattle, 2 sheep and 2 dogs.

I always make a list of stages. Then I can repeat the process in the same style if I need to do additional figures at a later date. I also mark off progress so I know where I am and to give myself a sense of achievement.

The figures are essentially on one continuous if virtual conveyor belt. I do something to each figure in the army or armies, then repeat. I never paint unit-by-unit.

First step is to prepare the castings.

1. File bottom of bases flat. 
I just run the figures up and down a large domestic flat file. A couple of passes is usually enough.
2. Remove casting tags and any flash.
Very few of the foot figures had any flash or casting lines, but they did have little casting tags which needed to be knocked off or cut. The Timeline horses were more challenging but I think they will look alright once they are painted.
3. Correct leaning figures. 
Some figures seemed to be bent over in relation to the angle of their bases. This was easily corrected by carefully bending them at the ankles.
4. Drill holes for pikes and superglue pikes.
Thankfully the pikemen are all empty handed allowing me to add North Star pikes. Some hands needed drilling with a pin vice. I used to use 2-part epoxy resin for sticking pikes etc, but have been experimenting with superglue. Epoxy resin seems to be quite scarce these days.
5. Assemble gun, cattle, riders and stick riders on horses.
6. Add Green Stuff to 'shorts' and around arm joints on riders.

Greenstuff and rubber-tipped sculpting tools. Some of the Foundry figures are 'Sea Dogs' so I built round the bottom of their open-ended shorts to represent the big baggy (but gathered) trousers worn by the lower orders of landlubber.
I decided the figure on the lower right was OK as it was.
Some of the Timeline riders have separate arms and needed filler to disguise the joints. I then realised that I'd have to rebuild the shoulder detail but I found that it was quite difficult to replicate the fine detail of the original castings. Not my finest hour but they will probably look OK once painted and on the table in a dimly-lit wargames club!